Thai Basil Studies'
Gardening Hints and Tips
to smooth out your indoor gardening experience.I've got quite a few ideas, I will post at least weekly.
But before you scroll on, hungry for knowledge ...
I THINK I'VE INVENTED AN INCREDIBLE PLANT BASED STIMULATOR
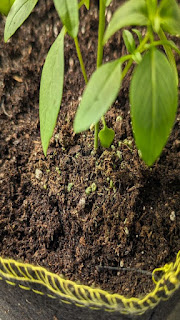
Plant support using fabric pots with handles:
This only works if you have the exterior sewn on handles, and the right amount of slack in the handle. Has been working wonders for my fabric plant pots*
Pull handle over soil towards plant, "weave" your support stake between the handle and the inside of your fabric pot. The friction between the soil, fabric pot and the handle, make it hard for the support cane to shift. The handle's presence prevents the cane from digging into the soil. You can just make out another cane in the background, it's being pulled in through the soil, damaging root hair and hyphae.
Another option is to cut up a plastic bucket, one that your fabric pot would fit into. Cut a 4 inch deep ring off of the top, after removing top rim, then insert the ring inside the fabric pot, after filling with soil. This does three things;
- gives a solid wall for any support canes to rest up against, instead of bare soil, protecting root zone from damage, because of strained canes under the weight of fruits.
- forces top roots to circle down to more nutrient rich areas.
- retains moisture in the upper part of the fabric pot.
===================================
Precision feeding/watering and foliar applications
Basil, as are most plants, are delicate as seedlings and young plants. Watering and feeding them should be a delicate operation.
My only interest in the foliage, at such a young age, is an indicator of health. My primary interest is root development; with a strong root mass comes strong, vigorous, aromatic and healthy plants.
Having a gentle watering / feeding and foliar application regimen in place, can help keep the plant undisturbed whilst it is putting in so much energy into creating the best possible foundations for growth, its roots.
I use the implements on the left to water and feed all my plants, at all stages.
The pipette for small plug plants, slowly dripping the contents onto the soil, not squirting it.
The small syringe outer (no plunger used, it's too over powering.) is used for larger plants, often used with the adapter seen amidst the pipe, this stems the flow of water even more.
I fill 50 to 80 ml of water/feed, depending on the weight of the pot, this is the perfect amount to water my small 3 inch pots, and leave them moist not waterlogged. I do not run off, ever.
The larger 500ml syringe outer, is used to water established plants, it flows at the perfect rate, so as to not water log the top and get run off down the sides.
The pipe can be used to get in between larger plant's foliage, so you can direct water flow easily. Again fill the syringe and direct the flow with pipe across the soil surface. Here's my Plastic syringe kit*
Precision foliar applications are sometimes required. Not necessarily with nutrient elements included, but perhaps just to keep humidity high.
With very young seedlings and younger plants, most bottle sprayers, even on a fine setting are sometimes too much. Getting among a large set of basil plants is a pain with a large bottle, especially if you religiously apply to the underneath of the leaves. As you should, if you're using the foliar to apply nutrient, because of a deficiency.
Enter the atomiser foliar sprayers*. Little 50ml sprayers, that deliver an ultra fine mist that soaks everything very quickly. Also, as the mist is so fine, it is rare for water balls to accumulate. The leaves get a good soaking. Very much easier to get in between a tray of plants and get in underneath them.
============================================
Rooting cuttings
No crash course in the actual taking of cuttings, more of a tip to help roots take hold faster.
So, it is likely you refresh the water for your cuttings on a regular basis, right?
Now then, here's a problem with that. A cutting placed in water, will start to form and secrete rooting compounds, to help with the horrific situation you've just put it into, I mean, fancy cleaving off a piece of perfectly healthy plant and dunking it into water, brutal you are!
Any hoo, if you do replace the water, you're rinsing away vital compounds that will assist in the creation of roots. Instead, top up the rooting vessel with dechlorinated water when it needs it.
You should be able to carve a day or two off your rooting times with this method.
====================================
Re-potting - Potting Up
A delicate operation. Here's a way of reducing transplant shock and to ensure the roots have the minimum of disturbance, whilst getting the maximum contact with the new soil. Allowing your plants to soldier on that little bit quicker after potting up.
Fill your new pot you are potting up into with soil as normal. At the right level, add a pot the same size as the pot you will be taking the plant from, and fill the new container around the plant pot.
Once you have filled your new container and gently settled it around the "stencil plant pot", take out the stencil, revealing the perfect shape and sized hole, ready for transplanting.
New plant root ball, perfectly in place. Perfect contact for the roots and the new rich soil.
Minimum disturbance, your plants should maintain vigor after transplant.
It is also advisable to transplant in low light conditions and in high humidity.
Hope all this helps.
Remain well, cheers n gone.
*Amazon stinky links, sorry thank you. x


No comments:
Post a Comment